The DIY & Crafts Blog

DIY Wooden Outdoor Storage Bench
A DIY wooden outdoor storage bench is perfect for any garden, patio, or backyard. It provides seating, storage, and an attractive feature for your outdoor space. Whether you need a place to store gardening tools, cushions, or other outdoor essentials, this multi-purpose garden bench is a practical and stylish solution.
Why Build a Wooden Outdoor Storage Bench?
There are several benefits to building your outdoor storage bench:
- Extra Storage – Keeps your outdoor area organised by storing tools, toys, and cushions.
- Durable and Weather-Resistant – Your bench can withstand outdoor conditions with the right materials and finish.
- Customisable – You can choose the size, colour, and design to fit your space.
- Budget-Friendly – Building your bench is often cheaper than buying one from a store.
Tools and Materials Needed
Before you begin, gather the necessary materials and tools.
Materials:
- Wooden boards (cedar, pine, or treated wood)
- Plywood for the seat
- Hinges (for the storage lid)
- Wood screws
- Wood glue
- Sandpaper
- Wood stain or paint
- Outdoor sealant
Tools:
- Measuring tape
- Saw (circular or hand saw)
- Drill
- Screwdriver
- Clamps
- Paintbrush or roller
- Safety goggles and gloves
Step-by-Step Guide to Building Your DIY Wooden Storage Bench
Follow these simple steps to build your outdoor storage bench.
Step 1: Plan and Measure
Start by deciding on the dimensions of your bench based on your available space. A standard size is about 4 feet long, 18 inches deep, and 20 inches high. Use a measuring tape and mark your wood before cutting.
Step 2: Cut the Wood
Using a saw, cut the wooden boards according to your measurements:
- Side panels: Two pieces for the bench’s sides.
- Front and back panels: Two pieces to connect the sides.
- Bottom panel: One piece for the base of the storage area.
- Lid: One piece for the seat that will act as a cover for the storage.
- Legs (optional): Four pieces for additional height and stability.
Step 3: Assemble the Frame
- Attach the side panels to the front and back panels using wood screws and wood glue.
- Secure the bottom panel inside the frame to form the base of the storage compartment.
- Use clamps to hold the pieces together as you drill and screw them in place.
Step 4: Attach the Seat Lid
- Fix the hinges on one side of the seat lid so it can open and close smoothly.
- Ensure the lid fits securely over the top and allows easy access to the storage space.
Step 5: Sand and Finish
- Use sandpaper to smooth out rough edges and surfaces.
- Apply wood stain or paint to enhance the appearance and protect the wood from the elements.
- Let it dry completely before applying an outdoor sealant for added durability.
Customization Ideas for Your Wooden Storage Bench
Make your DIY bench unique by adding personal touches:
- Add a Cushion: For extra comfort, place a weather-resistant cushion on top.
- Decorative Carvings: Use a wood carving tool to create patterns or initials.
- Paint Patterns: Create a stylish look with two-tone paint or a stencil design.
- Install Casters: Add wheels for easy movement around your garden or patio.
Maintenance Tips for Long-Lasting Use
To keep your outdoor storage bench in great condition:
- Reapply Sealant Annually: Protect against moisture and sun damage.
- Check for Loose Screws: Tighten any loose hardware over time.
- Store Cushions Indoors: Keep fabric items dry to prevent mould and mildew.
- Clean Regularly: Wipe down with a damp cloth to remove dirt and debris.
Conclusion
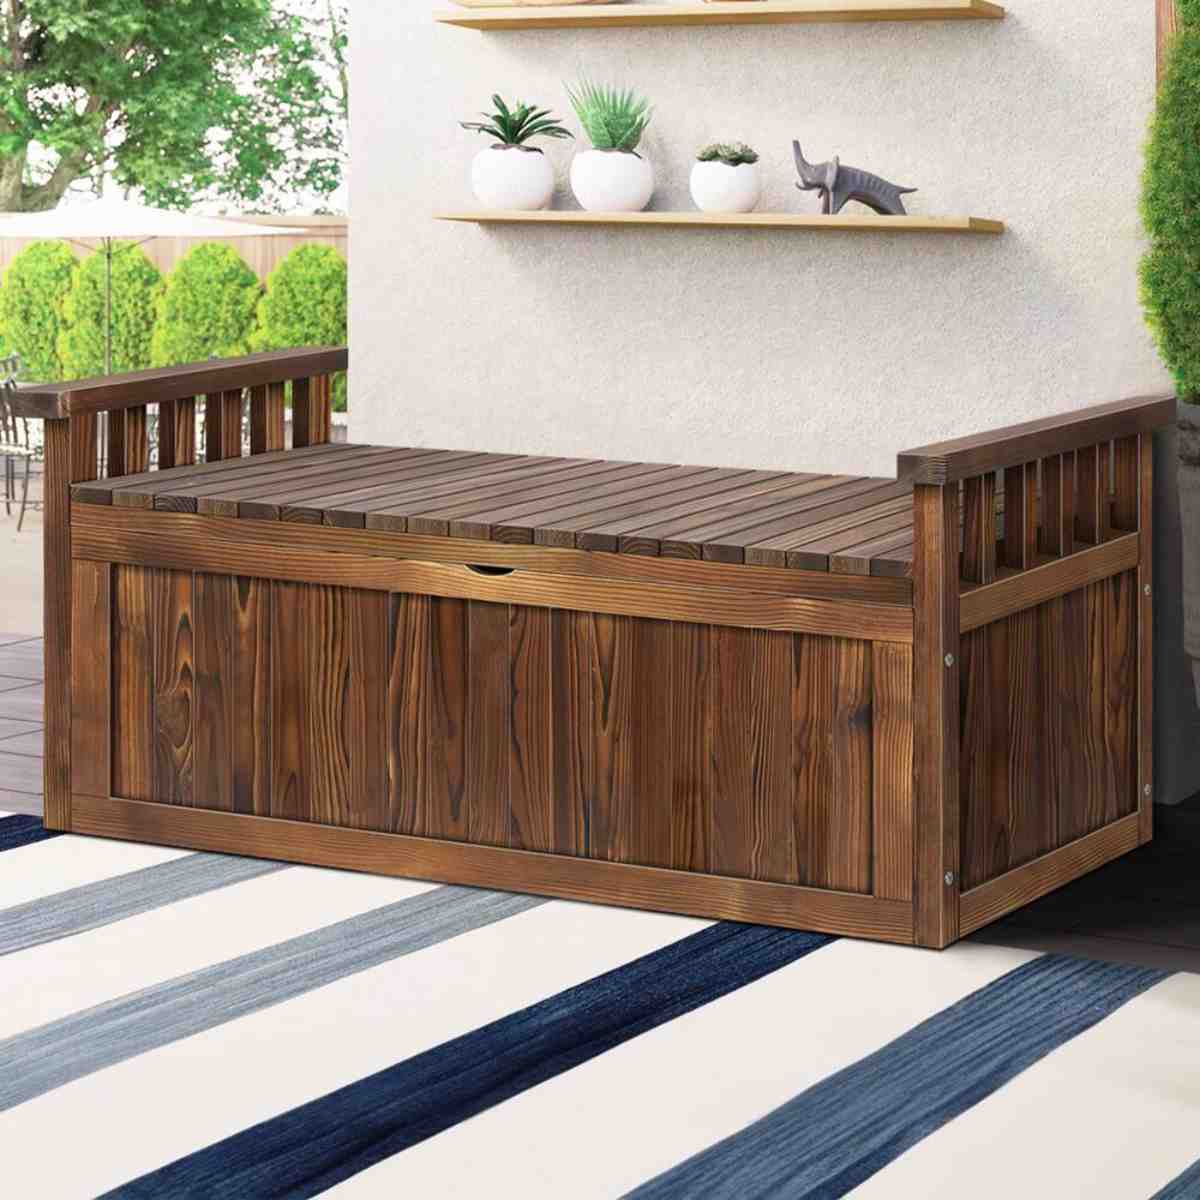
Building a DIY wooden outdoor storage bench is a rewarding project that adds function and beauty to your outdoor space. With simple tools and materials, you can create a durable, stylish, and multi-purpose garden bench that provides both seating and storage. Whether you’re a beginner or an experienced DIYer, this project is an excellent way to enhance your backyard with practical and attractive outdoor storage ideas.
Get started today and enjoy your handcrafted wooden storage bench for years to come!


YOU MAY LIKE


